
How to illustrate a Kamishibai PRO DIY story (without being John Lasseter)
Not daring to illustrate a Kamishibai story because you think that to do so you have to be John Lasseter? We tell you the secret of how we do it in our workshops... in less than two hours!
If you already know about the Kamishibai technique, surely the idea of creating your own stories will come to mind. It is a very enriching activity, especially if it is done in a group. However, creating a Kamishibai story from scratch can be intimidating, if not laborious.
Today we tell you how to carry out half of the process, that is, how to illustrate a Kamishibai story that has already been written. Don't worry, you don't have to be John Lasseter. And if you don't believe us, you can download kamishibais illustrated in our workshops, created in less than two hours. Go ahead, it's time to grab the pencil!
Why creating a Kamishibai story?
Telling a Kamishibai story is a very social experience. It requires an attentive audience and a gaito kamishibaiya (Kamishibai storyteller) capable of capturing and keeping their attention. When this happens, the sense of community created at the end of the narrative can be very powerful. The stories become thrilling. Ideas consolidate. And you'll probably hear the words "another one, another one."
The key to everything is in the story. If we choose (or create) a kamishibai story that doesn't help create that sense of community, the messages will never get through properly. There'll be yawning. There will be questions that have nothing to do with it (of the type: did you know that my brother has a stuffed monkey named Peter?). In addition, the more familiar the storyteller is with the story, the easier it will be for the storytelling to be a success.
All very nice (you will tell us), but I am not an actress or actor. I wouldn't say I have any public speaking fluency. Come on, my legs are shaking just thinking about it. Of course! And who doesn't? Stage fright is commonplace, especially when you don't have much practice. We're sorry to inform you that you're no different in this respect. :)
The Kamishibai technique is originally conceived to solve these problems. Try to open the doors of the butai (Kamishibai Theater), hide behind and literally read the text of the story, passing the slides when appropriate. It works, doesn't it? Well, from here we like to encourage a more theatricalized narration, with more resources and more effective, but listen, the truth is that this way, to the basics, the thing engages.
Another option is to start creating our own stories in a group. The first thing you win is that, from the outset, we are already familiar with history. It's much easier to count. The messages and the way they are transmitted are more like you. Yes, of course the impact of the novelty is lost, of what will happen next, which is an important hitch factor. But identifying what we have created when we see it put in the theater is also a highway to that sense of community we seek.
How to illustrate a Kamishibai story?
Today we are going to talk to you about halfway through the process: how to illustrate a Kamishibai story that has already been written. To do this, we will take as an example our Don Quixote and the Adventure of the Windmills (DIY). It is a passage from Cervantes' novel that almost everyone knows, has a powerful message and works very well in Kamishibai. We have used it in several successful workshops. In fact, below you can download free very different illustration proposals made with it in less than two hours.
In the folder of our don Quixote we find the story in 15 story cards (14 + the cover) with the text on the back, a guide to read before we launch to illustrate, some illustration suggestions and a sketch template. Let's go for it!
Before you begin illustrating a Kamishibai story

We can't wait to get started! We have a whole arsenal of colored pencils, markers and waxes in front of us... The story cards are waiting for our art. Let's go there... Wait a minute! It's great to improvise, but with a little organization it's much more effective. Remember that, in addition to enjoying, we want to communicate a story and create a sense of community. Little by little, step by step. ;)
Carefully read the story and let the images pop up in your imagination.
In our Kamishibai workshops we propose two previous collective readings. The first is to make contact, without any pretension. No imagination. Each person is assigned a picture that has to be read aloud. At the end, clap your hands for the next one to continue the story. It's curious to see how something so simple creates small links that never existed before. Even if it doesn't seem so, we've already begun to illustrate.
Afterwards, we carry out a second, slower and more enjoyable reading, where we let the images fly around us. If they fly or crash, that's up to everyone, but the objective, which is to get closer to the content of the story, is achieved.
Create a pencil sketch of each image in the sketch template.
With the story Kamishibai DIY by don Quijote you are provided with a sketch template (which you can download and print it here). It consists of 15 numbered rectangles (14 story cards + the cover) where we must sketch those images that have been created in the imagination. Not only do we recommend not to launch to illustrate the sheet without having made a previous sketch, it is that in addition these sketches will be pasted in the corresponding sheet. So the narrator will always see what his audience is watching while telling the story. Come on, the Kamishibai technique you already know a lot about.
Think about which is the idea you want to convey.
It will help you a lot to place the picture in the story. Ask yourselves questions. Is this poster a character presentation? Does it develop a conflict? Do you solve it? And more mundane things like: I'd like you to laugh or be surprised. For example, the 12th illustration of our Don Quixote DIY simply says: Bada-boom!! You can download it here. It's Don Quixote's strike against a windmill. In the workshops, he always provokes laughter. It is essential that it should produce it, because in this way it is much better understood that Don Quixote was totally wrong to think that they were not windmills, but giants.
Choose the most adequate frame for each scene.
Yes, maybe you hadn't thought about this, but a Kamishibai is actually closer to a storyboard than a book. So the type of plane you use on each plate will have a meaning of its own. Don't take it lightly!
 | i. Extreme close-up shot: interesting to highlight a detail that would otherwise go unnoticed. For example: a bump on the head. |
 | ii. Close-up: with it you will create a feeling of intimacy and confidentiality of the character. If a character is developing a strategy, a close-up of his face almost lets us see his thoughts. |
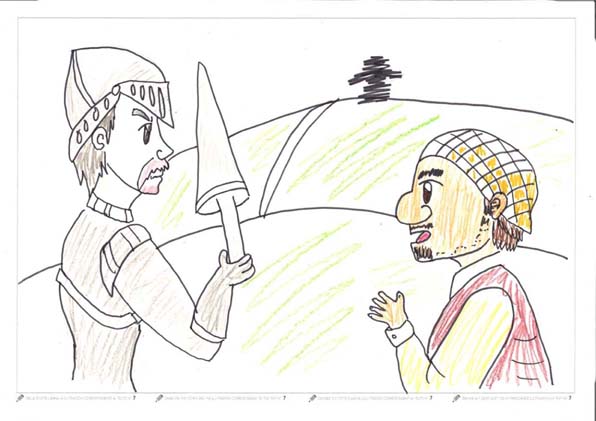
 | iii. Medium shot: it is very useful to show a relationship between two subjects (a conversation, for example). |
 | iv. Long shot: adequate for showing character movements. |
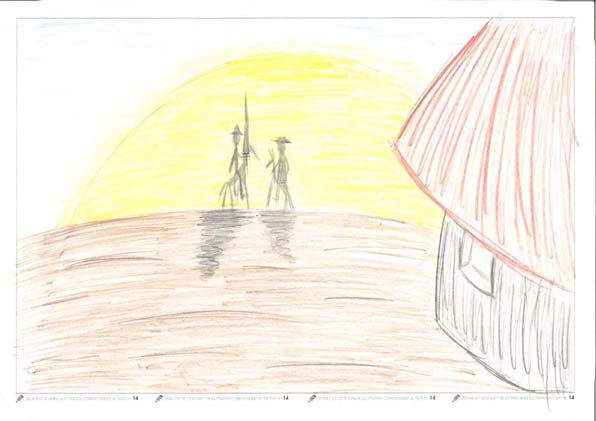
 | v. Master shot: perfect for communicating a relationship with the environment (such as loneliness, harmony, etc.). |
Illustrate according to the story and simplify if necessary.
The Kamishibai, after all, is a theatrical act. Let no one tell you "dogmas" about what Kamishibai is and is not. No supposed expert can tell you what your Kamishibai illustration should be like. The reality is that Kamishibai will always depend on three factors: the audience, the narrator and the story. And there is never a Kamishibai representation like this. It's always unique. It's ephemeral. Your illustration will always be the same, but your story won't be the same.
Having said that, the more appropriate the illustration is to your plate and the whole work, the more effective the representation will be. But let no one tell you: it's very complex, it's very abstract, it's very... No. Simplify and concretize if necessary, if it makes sense to do so, but don't think "they are going to get lost amidst so much complexity" or "I have read that the Kamishibai illustrations have to be in such a way" or "I am very bad at illustrating". Then why bother creating? Let your guide be one: think about how to help to communicate the story effectively and accurately. Throw away words that deny creativity such as "a kamishibai illustration must be...".
Don't settle for the first thing you sketch.
No, we're not encouraging perfectionism. In fact, we recommend you run away from him. But it's always great to wonder if there's a better way to illustrate the scene action. Try to change the type of plane, the characterization or anything else you can think of. For example: Maybe you thought that the famous "Bada-boom!!"which provokes laughter is a medium plane of don Quixote bumping into a mill. What if it was a general plane with Don Quixote flying high up in the air?
Characterize your characters according to their personality and emotions.
We will never get tired of repeating that Kamishibai is a theatrical act. And that means that absolutely everything is capable of having a meaning. Just a moment! This, rather than scare you, must be your springboard to illustrate. Think of the colour, for example. It is not the same to paint Don Quixote's face red or yellow. I'm sure that way, without thinking, you've already associated those colors with different moods.
Hair (or its absence), wrinkles, polka dots, costume garments... are resources that are usually used in theatre to help define and better understand a character or situation. Keep everything in mind!
Choose well your character's body posture.
Body language is fundamental to empathize with the action or characters. Expressing joy with a character with his arms folded is difficult, no matter how much you can see his teeth when you smile. It will help you if you dramatize the scene you have in mind: surely your body will react accordingly (eyes covered by fear, curved eyebrows of surprise, etc.).
Use an appropiate drawing technique.
Yes, the drawing technique you employ also has its own meaning. But, in this case, we advise you to use "dry" techniques. We do not recommend water-based paints (acrylic, watercolours, tempera) or oil paints. The paper would warp and make it very difficult for the sheets to pass through. Much better if you use coloured pencils, markers, cakes or one of our favourite techniques: collage.
Illustrated stories in our Kamishibai Workshops
For some time now, we have been incorporating in our Kamishibai Workshops the illustration of a Kamishibai story. It is curious to observe how, despite the fact that the great majority of the workshopists claim to know the Kamishibai technique well, when you ask them on which story card they have to paste the sketch corresponding to story card 12, for example, they do not finish giving a unanimous answer. Yes, it's from the back of story card 11, but if we asked you live... would you say it so quickly?
Here you have in pdf format (and free to download) kamishibais created in our workshops in less than two hours in pdf format:
 | Download Kamishibai story cards "Don Quixote in Madrid" |
 | Download Kamishibai story cards "Don Quijote in Vinaròs" |
The final climax of the workshops is to put these stories in the Kamishibai PRO Theater (BIG A3) and adapt the narrative to the created illustrations. Laughter, horror, surprises... all kinds of sound reactions are heard when you see what your colleagues have drawn. And the ultimate goal, accomplished: a very powerful sense of community.
Have you already illustrated your Kamishibai story? Congratulations! We are looking forward to hearing what the process has been like. Write us something below! And if you found this article interesting, don't forget to share: you will keep us motivated in spreading this technique full of possibilities.
See you in our next article!
Related articles

7 things you should know about Kamishibai (and its use).
Do you know everything there's to know about Kamishibai? Find it out!
Productos relacionados

Deja un comentarioDa una respuesta
Blog categories
Archivo del blog
Buscar
Últimos comentarios

Fabiana BEGAUD
en How to illustrate a Kamishibai PRO DIY story...
claudine legac
en Got a new website, blog and many renewed hopes!
claudine legac
en How to tell the Kamishibai story "The Sun Cat"...
Nicole MIKOLAJEK
en What would you do if you had a Kamishibai?...


1 Comentario
Fabiana BEGAUD 29/12/2021
Très intéressant cet article, merci pour vos conseils !